Kartoza - Tutorial: Updating Raster NoData Value with Rasterio
Updating raster NoData value in Python is easy and straightforward. Here is how to do it.

A raster NoData value is a special value assigned to cells in a raster dataset to indicate the absence of valid data for that location. It marks areas where there is no information or where data is missing, ensuring that these cells are excluded from calculations or analysis.

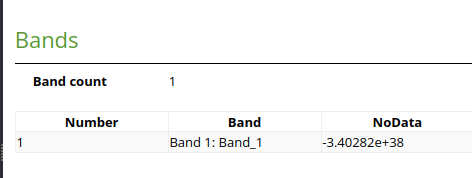
This is the nodata value before update

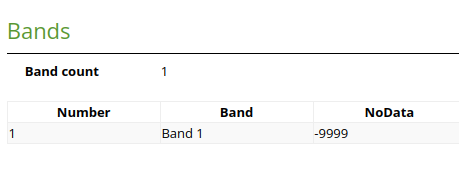
This is the nodata value after update
In the CPLUS API, which is part of the CPLUS Plugin that we are building for Conservation International, we integrate Natural Climate Solution (NCS) Pathways from Naturebase. In our workflow, we update raster NoData value to -9999, to enable performing raster calculations. We will be using Rasterio in this tutorial, so you need to make sure you have it installed.
Once you have Rasterio on your system, you can follow this snippet.
import rasterioinput_raster = 'input_raster.tiff'output_raster = 'output_raster.tiff'new_nodata_value = -9999with rasterio.open(input_raster) as dataset:profile = dataset.profiledata = dataset.read()# Set the new nodata value in the profileprofile.update(nodata=new_nodata_value)# Replace the current nodata value with the new nodata value in the data arraydata[data == dataset.nodata] = new_nodata_value# Write the output raster with the updated nodata valuewith rasterio.open(output_path, "w", **profile) as dst:dst.write(data)
I will explain the snippets
Define the input raster, output raster, and nodata value
input_raster = 'input_raster.tiff'output_raster = 'output_raster.tiff'new_nodata_value = -9999
Open input raster, then read the profile and the data. Raster profile basically contains raster metadata, like nodata value, block size, etc.
with rasterio.open(input_raster) as dataset:profile = dataset.profiledata = dataset.read()
Set NoData value in the profile and replace the NoData value with the new value
# Set the new nodata value in the profileprofile.update(nodata=new_nodata_value)# Replace the current nodata value with the new nodata value in the data arraydata[data == dataset.nodata] = new_nodata_value
Finally, write the data into a raster file using the updated profile.
# Write the output raster with the updated nodata valuewith rasterio.open(output_path, "w", **profile) as dst:dst.write(data)
You can customise the snippets above to suit your needs. For example, you can set the output and input raster paths based on your own data.
Zulfikar Akbar Muzakki
Zakki is a software developers from Indonesia and is based in Purworejo, a small town in Central Java. He studied Information System in Universitas Indonesia. His journey with Python and Django started when he first worked as a web developer. After discovering the simplicity and power of Python he has stuck to it. You know what people say, “Once you go Python, you’ll never move on!”. His interest in GIS stemmed from his activities exploring random things in the digital map. He looks for cities, interesting places, even following street view from one place to another, imagining he was there physically. Zakki is a volunteer in kids learning centre, where he and his team run fun activities every Sunday. When he is not dating his computer, he spends his time sleeping or watching documentary and fantasy movies. Give him more free time, and he will ride his motorbike to someplace far away. He enjoys watching cultural shows and learning about people, places, and cultures. He also loves singing and dancing, but that doesn’t mean he is good at it.

No comments yet. Login to start a new discussion Start a new discussion